One of the most common MLA format questions: where do the page numbers go, and what should the header look like? Whether you're formatting a document in MS Word or Google Docs, here's the definitive answer for MLA 9 formatting.
The MLA 9 Header Format
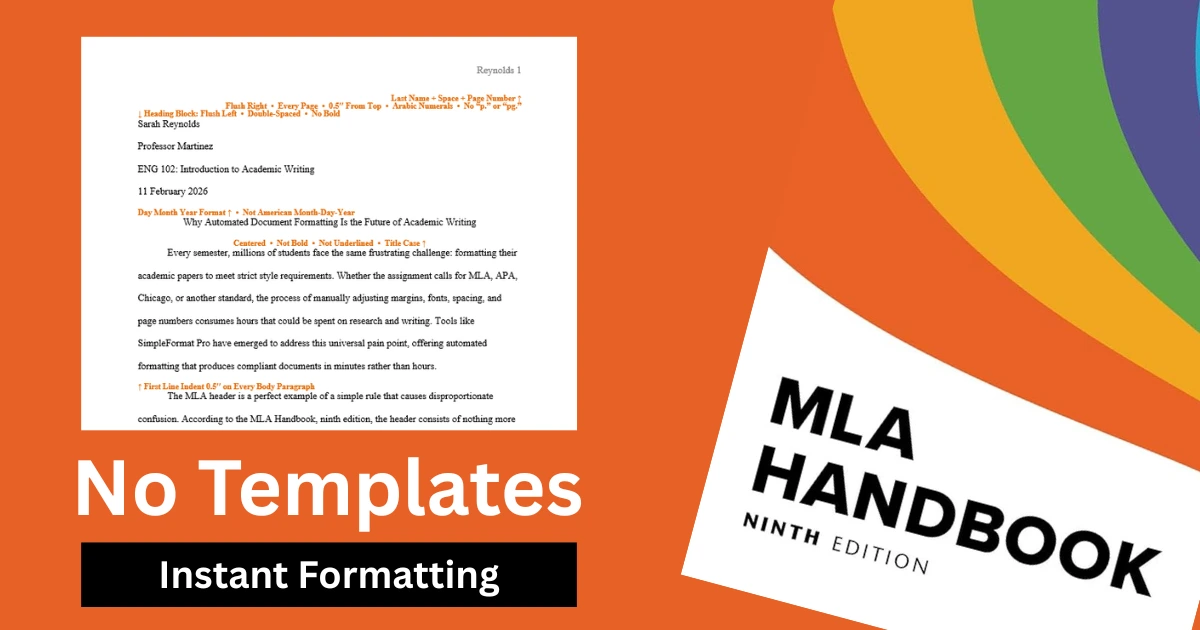
According to the MLA Handbook, ninth edition, the header appears in the top-right corner of every page. It sits 0.5 inches from the top edge of the page, flush right. The content is simple: your last name followed by a space and the page number. That's it. So if your name is Sarah Reynolds and you're on page three, the header reads "Reynolds 3" with no punctuation between the name and the number.
No period. No comma. No dash. Just last name, space, number.
This is one of the most frequently messed up elements in MLA formatting, and it costs students marks every semester. Common mistakes include adding "p." or "pg." before the number, putting the header on the left side, using Roman numerals, or forgetting to include it on the first page.
Page Numbering Rules
MLA 9 uses Arabic numerals for all page numbers — 1, 2, 3 — never Roman numerals. Page 1 is the first page of text, which in MLA is also the page that contains your heading block (name, professor, course, date) and your title. Unlike APA, which uses a separate title page, MLA puts everything on page one.
The header appears on every page including the first. There are no exceptions to this rule unless your instructor specifically says otherwise.
Do not use "p." or "pg." abbreviations anywhere in the header. The number stands alone next to your last name.
How to Set This Up in Microsoft Word
Go to Insert > Header > Blank. Click inside the header area. Set the alignment to flush right. Type your last name followed by a space, then go to Insert > Page Number > Current Position > Plain Number. The header should now automatically number every page.
Make sure the header is set to 0.5 inches from the top edge. You can check this in Layout > Margins > Custom Margins > Header.
How to Set This Up in Google Docs
Double-click the top of any page to open the header. Type your last name followed by a space, then go to Insert > Page Numbers and select the option that places numbers in the top-right corner. Make sure "Different first page" is unchecked — MLA requires the header on every page including the first.
What About the Heading Block?
The heading block is separate from the header. It appears only on page one, flush left, double-spaced, and contains four lines:
- Your full name
- Your instructor's name
- The course name and number
- The date in day-month-year format (11 February 2026, not February 11, 2026)
The title follows immediately after the heading block, centered on the next double-spaced line. The title is not bold, not underlined, not italicized, and uses title case.
Common Mistakes to Avoid
- Centering the heading block instead of keeping it flush left
- Using American date format (February 11, 2026) instead of international format (11 February 2026)
- Bolding the title
- Adding extra space between the heading block and the title
- Forgetting the header on page one
- Using "p." or "pg." in the header
These are the errors that get flagged most often by instructors and grading rubrics.

The Faster Way
If you'd rather skip the manual setup entirely, SimpleFormat Pro generates a perfectly formatted MLA 9 document in under two minutes. Paste your content, select MLA 9, and the tool handles headers, page numbers, heading blocks, margins, fonts, spacing, and every other formatting requirement automatically. The output is a downloadable .docx file ready for submission — no templates, no manual adjustments, no guesswork.
SimpleFormat Pro supports MLA 9, APA 7, Chicago 18, Harvard, IEEE, Vancouver, AMA 11, and KDP publishing formats. Format your next paper at simpleformat.pro.
Ready to Format Your Document?
Stop fighting with margins and headings. Get a perfectly formatted paper in minutes.
Try SimpleFormat Pro Free →